1.机械臂正解
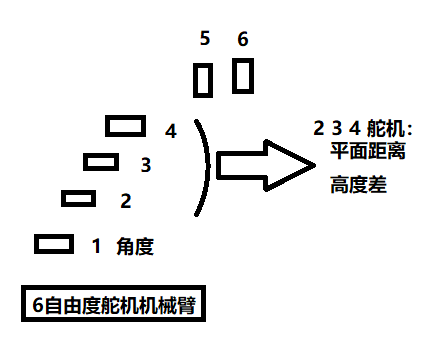
如图:
5 抓钩角度调整
6 抓够进行处理
2 3 4 这3个舵机用于控制三维的距离:高度与平面距离 若是固定高度 则高度可以固定调整
1 控制角度
需要整合极坐标和三维坐标来控制
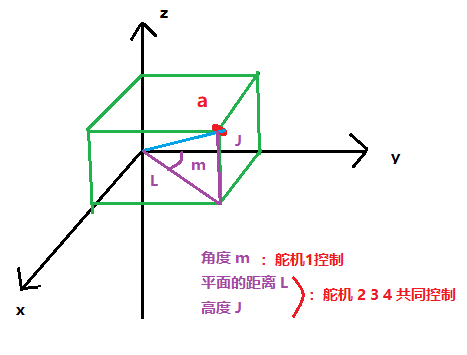
2 3 4舵机 已经知道力臂长度的情况下 只要知道角度 通过三角函数 即可算出 各种的l和j
L=l2+l3+l4
J=j2+j3+j4
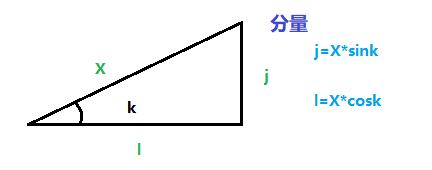
X为力臂 k为角度
l=X*cosk
j=X*sink
相关代码
import math

l=X*math.cos(dg * (math.pi / 180))
j=X*math.sin(dg * (math.pi / 180))
实际代码生成python
mog={0:90,1:90,2:90,3:90,4:90,5:90}
mog={
     0:[90,0,180,0],
     1:[90,0,180,10.5],
     2:[90,0,180,14.5],
     3:[90,0,180,17],
     4:[90,0,180,0],
     5:[90,90,150,0]
}
#max 42cm
#L [10,40] J [10,40]
#1 2 3 为L J距离生成
2.1 两自由度机械臂逆解——肘部向上模式
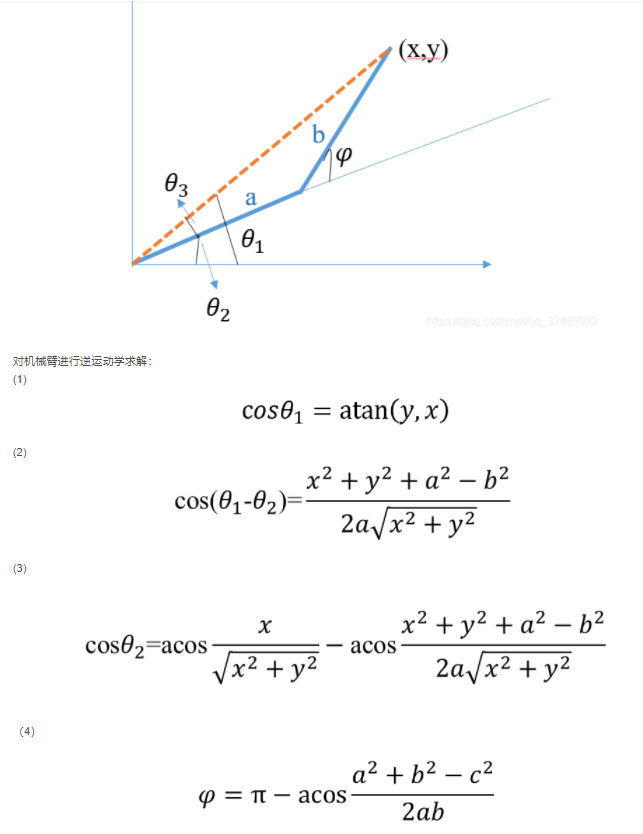
截图来自:https://blog.csdn.net/qq_37469992/article/details/108143752
所以转到只需要知道:上面的(3)进行acos求解 和(4),结果需要转化为角度。
import math
#a b 为力臂 x y 为坐标轴实际距离
dg_2=(math.pi-math.acos((a**2+b**2-(x**2+y**2))/2*a*b))*180/math.pi
#先求cos 2
c_dg_1=math.acos(x/(x**2+y**2)**0.5)-math.acos((x**2+y**2+a**2-b**2)/(2*a*math.sqrt(x**2+y**2)))
dg_1=math.acos(c_dg_1)*180/math.pi
print(dg_1,dg_2)
相信AI 下面是AI的代码:
import math

# 假设 a, b, x, y 已经被定义并赋予了具体的数值
a = ...  # 力臂 a 的长度
b = ...  # 力臂 b 的长度
x = ...  # x 坐标
y = ...  # y 坐标

# 计算 dg_2
dg_2 = (math.pi - math.acos((a**2 + b**2 - (x**2 + y**2)) / (2 * a * b))) * 180 / math.pi

# 计算 cos(θ1 - θ2)
cos_theta_1_minus_theta_2 = (x**2 + y**2 + a**2 - b**2) / (2 * a * math.sqrt(x**2 + y**2))

# 检查 cos_theta_1_minus_theta_2 是否在 [-1, 1] 范围内
if -1 <= cos_theta_1_minus_theta_2 <= 1:
    theta_1_minus_theta_2 = math.acos(cos_theta_1_minus_theta_2) * 180 / math.pi
else:
    raise ValueError("cos_theta_1_minus_theta_2 is out of range")

# 计算 cos(θ1)
cos_theta_1 = x / math.sqrt(x**2 + y**2)

# 检查 cos_theta_1 是否在 [-1, 1] 范围内
if -1 <= cos_theta_1 <= 1:
    theta_1 = math.acos(cos_theta_1) * 180 / math.pi
else:
    raise ValueError("cos_theta_1 is out of range")

# 计算 dg_1
dg_1 = theta_1 - theta_1_minus_theta_2

print(dg_1, dg_2)暂时代码:肘部向上模式
from machine import I2C,Pin
import time
from servo import Servos
i2c=I2C(0,sda=Pin(0), scl=Pin(1), freq=10000)
s=Servos(i2c,address=0x40,min_us=500, max_us=2500)

mog={0:90,1:90,2:90,3:90,4:90,5:90}
# 5,90-15


def dg(ed,n=0,t=2):
    t=t/100
    st=mog[n]
    x=1
    if st>ed:
        x=-1
    for i in range(st,ed,x):
        s.position(n,i)
        mog[n]=i
        time.sleep(t)

def init_top():
    s.position(0,90)
    s.position(1,90)
    s.position(2,90)
    s.position(3,90)
    s.position(4,90)
    s.position(5,90)
    mog={0:90,1:90,2:90,3:90,4:90,5:90}
def zero():
    dg(0,0)
    dg(0,1)
    dg(0,2)
    dg(0,3)
    dg(0,4)
    dg(90,5)
    mog={0:0,1:0,2:0,3:0,4:0,5:90}

def top():
    dg(90,0)
    dg(90,1)
    dg(90,2)
    dg(90,3)
    dg(90,4)
    dg(90,5)
    mog={0:90,1:90,2:90,3:90,4:90,5:90}

def bite(f=True):
    if f:
        s.position(5,155)
    else:
        s.position(5,90)
def hello(t=0.02):
    top()
    dg(135,2,t)
    dg(45,2,t)
    dg(90,2,t)

init_top()

import math

def get_deg(x,y):
    # 假设 a, b, x, y 已经被定义并赋予了具体的数值
    a = 14.5  # 力臂 a 的长度
    b = 17  # 力臂 b 的长度
#     x = 19  # x 坐标
#     y =12 # y 坐标
    # 计算 dg_2
    dg_2 = (math.pi - math.acos((a**2 + b**2 - (x**2 + y**2)) / (2 * a * b))) * 180 / math.pi
    # 计算 cos(θ1 - θ2)
    cos_theta_1_minus_theta_2 = (x**2 + y**2 + a**2 - b**2) / (2 * a * math.sqrt(x**2 + y**2))
    # 检查 cos_theta_1_minus_theta_2 是否在 [-1, 1] 范围内
    if -1 <= cos_theta_1_minus_theta_2 <= 1:
        theta_1_minus_theta_2 = math.acos(cos_theta_1_minus_theta_2) * 180 / math.pi
    else:
        raise ValueError("cos_theta_1_minus_theta_2 is out of range")
    # 计算 cos(θ1)
    cos_theta_1 = x / math.sqrt(x**2 + y**2)
    # 检查 cos_theta_1 是否在 [-1, 1] 范围内
    if -1 <= cos_theta_1 <= 1:
        theta_1 = math.acos(cos_theta_1) * 180 / math.pi
    else:
        raise ValueError("cos_theta_1 is out of range")
    # 计算 dg_1
    dg_1 = theta_1 - theta_1_minus_theta_2
    print(dg_1, 90-dg_2)
    if dg_1>0 and dg_1<180 and (90-dg_2)>0:
        dg(int(dg_1),2)
        dg(int(90-dg_2),3)
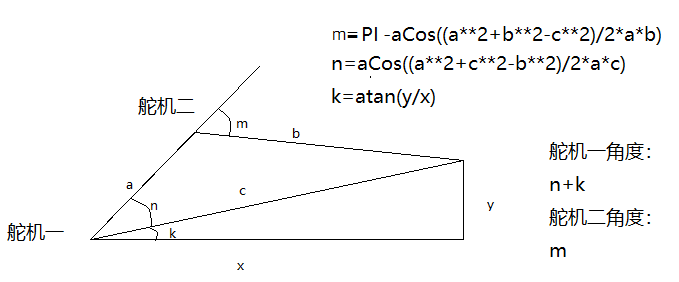
2.2 两自由度机械臂逆解——肘部向下模式
import math
a = ...  # 力臂 a 的长度
b = ...  # 力臂 b 的长度
x = ...  # x 坐标
y = ...  # y 坐标

#本人是的舵机二 为顺时针转动,可以设置与a水平为0度
m=180-math.acos((a**2+b**2-(x**2+y**2))/2*a*b)*180/math.pi
n=math.acos((a**2+(x**2+y**2)-b**2)/2*a*math.sqrt(x**2+y**2))*180/math.pi
k=math.atan(y/x)*180/math.pi
dg_1=n+k
dg_2=m
关于三舵机如何实施:
可以换成1+2
第一个舵机可以可以设置一个固定的值 ,然后后面两个舵机来移动,一般不动舵机一,若不够可以移动舵机一